
How To Repair Water Damaged Cabinet Sides

This is not beyond repair.
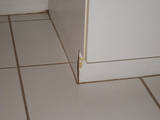
Cabinet ends swelling, due to water absorption, are something that I have seen in bathrooms more than kitchens. Never the less, the process of how to repair damaged wood or Formica cabinet sides, as a result of flooding water, is still the same. There are several approaches that can be taken, but I want to teach you the simplest one that I have discovered. You won’t need to remove the end of the structure at all. If the damage is comparable to the photo to the left, you may want to just sand and chisel down the swollen area and laminate over it with a piece of Formica or thicker finished board.
Tip: A word of caution, when you are cutting finished materials, do a trial run first on an extra piece of wood. This will help you determine which side of the board the saw is going to give you a clean cut on. When cutting with a saber saw or skill saw, the finished side (or,”good”) side faces down in order to yield a clean cut.
The next section has ten steps that will help you succeed with your
home improvement project of fixing a swollen cabinet side.
Steps To Repairing A Cabinet End Effected By Flooding Water
These are easy steps that will help you succeed at repairing a cabinet end which has been effected by flooding waters. Sometimes just the process of mopping a floor over many years will affect the ends of vanities because many of them have particleboard cores. This type of material actually absorbs water like a sponge.
With this method you will just be covering over the existing structure. Remember, the materials that you will need can be purchased from a local small cabinet manufacturing facility.
- Measure how much the counter top hangs over past the cabinet side. This will determine the thickness of the board that you can use.
- Measure the exact width and height of the side that will be covered over.
- Measure the cabinet edge and then add the thickness of the new board to your measurement. You will need something to glue over the two edges once you have attached the new side. Either use mica or wood veneer for this application. You are going to need to re-laminate the front toe base as well.
- I advise that the thickness of the board, you will be laminating over the old side with, be no less than 1/4” thick. You may use a pre-finished board for this application. You may want the board to be a little over-sized depending on how level, square and plumb the area is. If the inside of the cabinet has noticeable water damage you may want to cut and fit something on the inside. Usually a piece of “standard” thickness Formica is good to use on the inside.
- Remove the door and drawer
- Cut out the damaged area that is below the cabinet’s bottom line. Anything above the bottom line that is swollen will have to be addressed with chisels, a putty knife, a hammer and possibly a belt sander, if there is room to use one.
- Place the new board in position. You will have to fit it to the floor, to the back wall and notch it around the casing. This can be done with a saber (or, “jig”) saw and a belt sander designed for cabinet making. Minor gaps can be filled with caulk. A minor gap is less than 1/8.” Anything larger than this is going to look like a mistake. Remember, you are doing fine cabinetry work here, not rough trim carpentry. So with this in mind, take your time.
- If the board is larger than 1/4 inch thick, you may clamp it in position and screw it on from the inside of the cabinet. If it is ¼ thick or less, you can use contact glue. A word of caution, if you have never worked with contact glue, when the two pieces meet each other there will be no moving the parts for alignment. So, you have to make sure that your critical edges are aligned perfectly. Anything less than perfect and you will be sanding or filling your mistake.
- Laminate (or, “glue”) the inside of the cabinet with a piece of mica if you had to sand and chisel it as well.
- Glue the thin veneer or mica over the two edges. You will either need to file or sand the edge flush.
- The process of repairing a water damaged cabinet side (or, “end) should be done by people with moderate craftsmanship capabilities related to using saws, sanders, files, glues and hand tools. If you
If you are not skilled at building things, you should consider hiring someone who is capable of replacing a cabinet end that has been effected by the flooding waters. Make sure to review other sections on this site pertaining to “how to fix water damaged cabinet bottoms” and the section on “repairing water damaged cabinet toe kicks.”
This method will save you money because you will not have to remove cabinets and replace them. It’s a great way to accomplish cabinet repairs to your existing cabinets.