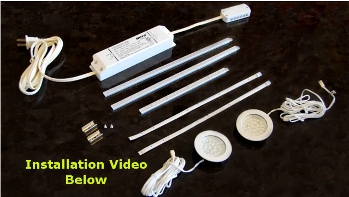
Installing LED Lights Under Kitchen Cabinets
 After watching the video below, you will know exactly how to install “light emitting diode” (LED) lights under your kitchen cabinets. It’s a lot easier than you might think. There are a minimal amount of tools required and for most standard size kitchens. The under cabinet LED lighting can be installed in a few hours.
There are a few different kinds of LED lights. The most common styles are the stick lights, tape strips and hockey puck designs To simplify these terms, they are commonly called bar and disc lighting.
The great thing about this form of lighting is that once all of the fixtures are installed, they can be controlled from one switch location. The video demonstration uses what is know as a driver. This is the central location where all of the lighting cord connections are plugged in. The driver has one power input plug that gets plugged into an outlet that is wired to a wall switch. This “driver” acts as a low voltage power converter for the .
Tools Needed For Installing LED Lights Under Cabinets
–Tape Measure
-Electric Drill
-Pencil
-Recommended Hole Socket Drill Bit
-Cordless Drill
-Power Extension Cord
-Seven Sixteenths Inch (7/16″) Drill Bit
–Shop Vacuum Cleaner
- To begin, you must determine where the low voltage transformer will be located. This will make the process go quicker and easier when it comes to the actual installation. You want to find a place where it will not be visible.
- Next, layout the LED under cabinet lighting locations to determine the proper spacing.
- Develop a plan for concealing the wires inside the cabinets or anywhere that they will be hidden from sight.
- Mount the brackets to the bottom of the cupboard if you are using disc lighting or drill the holes for the puck lights under the cabinets.
- Install the lights under the cabinets. If you are using the strip LED lights, they will snap into the brackets. The puck-lights will get forced into the hole you drilled. The tape LED lighting will need to have the adhesive protector peeled off.
- Drill the necessary wire channel holes in the upper cabinets by using the seven sixteenths inch (7/16″) drill bit. It’s a good idea to remove everything out of the upper cabinets where you are drilling the holes. This is a dusty job that’s what the vacuum is for.
- Thread the wires through the channels and connect them with the lights and the low voltage power converter (driver). There should be multiple connections on the terminal block of the driver for all of the wires to be plugged into.
- Plug the power cord into the outlet.
- Flip the switch and you are finished.
Where do the different types of LED lights work best according to kitchen cabinet design standards?
The strip lighting generally gets installed behind light rail cabinet molding. The disc styles work great for areas where the lights are going to be in plan view, like China cabinets or in cupboards that have glass doors. Refer to this article on installing under cabinet puck lights.The tape lighting is perfect for installing on the bottom of the base cabinets.
How you install your LED lighting will depend upon the manufacture’s directions. While shopping for the correct lighting to install under your cabinets, be sure to find the ones that are the easiest to install. There are so many different products and brands of LED lights available today, there’s no need to work with a complicated system for installing the lights. Find a set that is simple to mount to your kitchen cabinets and go for it, the simpler the better!

Thanks for your video,i was able to install kitchen lights myself.Just had a small problem with drilling.Thanks.