How To Install Kitchen Backsplash Tiles
 Are you looking for a contemporary, clean update for your kitchen that won’t bust your budget? The video below will show you how to install a wall-tile kitchen backsplash. There are many clips on Youtube to select from that have installation instructions. This one will show you how to install a ceramic and glass tile combination on the wall extending between the counter and the bottom of your upper cabinets.
Ceramic and glass tiles are beautiful and available in many different colors. They are also very easy to install.
Glass tiles are generally sold in a twelve-by-twelve (12″ x!2″) sheet and attached together with a net backing. This is really nice because you can just cut them out with scissors into strips or you can make them into individual tiles. Using the glass tiles will give the kitchen backsplash area a nice sleek, modern look.
Tools and Materials Needed:
- Tile cutter
- Tilers Trowel
- Thin Set Adhesive
- Protective Paper
- Masking Tape
- Rubber Float
- Three Part Epoxy Grout
- Sponge
- Bucket
- Measure and mark the backsplash material with a pencil where it needs to be cut.
- Place the ceramic piece flat in the cutter
- The tool has a sliding arm with a small cutting wheel. Align the wheel and lightly score the tile.
- Drop the feet down and apply pressure to the tile backsplash piece and it will break along the score mark.
How To Install Kitchen Backsplash Tiles
- Start with a clean surface that is free of dust and grease build-up. Dawn Dish Washing liquid mixed with water works great for cleaning the walls.
- Cover your countertops, cabinets and appliances with protective construction/mask paper. This covering is available in rolls.
- To determine the amount of tiles you need, multiply the width by the height of the wall areas to be tiled. It’s a good idea to purchase a little extra so that you will not run out prior to finishing the project.
- Now comes the fun part, the layout of the wall tile design. In the video, the “do it yourself” Lowe’s countertops representative selected subway white ceramic and aqua glass tiles. The glass accents will really make the appearance of things “pop!”
- Apply a premixed adhesive on the walls with a tilers/masonry trowel. These generally have a serrated edge that measures the proper thickness of the mastic/thin-set adhesive. You can apply the glue onto the trowel using a putty knife or by dipping it into the bucket.
- After you gently wipe the Thin Set on, turn the trowel around and use the comb edge to gauge an even depth of the glue.
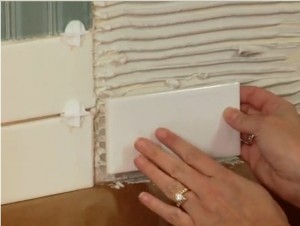
- Push the ceramic backsplash tiles into the mastic. If you have outlets to cut around, you can use a hand tile cutter. They are rather simple to operate.
- Insert grout line spacers between the backsplash tiles.
- Allow the ceramic and glass kitchen splashback adhesive to fully cure before grouting.
- Follow the manufacture’s instructions for applying three part epoxy grout and adhere to the safety information.
- Use a rubber grout float for applying the medium in the creases of the tiles. Work with a one foot area at a time.
- Use a large, damp sponge for wiping over the areas that you applied the three part epoxy grout to. Allow it to dry for fifteen minutes depending upon the humidity and the temperature of the room.
- Use a clean dry spounge to remove any remaining residue from the kitchen tiles.
- Apply caulk to the base of the backsplash and any exposed edges. The secret to success with this step is applying a small even bead and smoothing over it with a wet fingertip.
Installing ceramic and glass tiles are a great way to add real style to your kitchen backsplash. Depending upon the size of your kitchen, the job can be completed in a day or two. You can learn how to install many different types of kitchen tile backsplashes by visiting Youtube.

I am a professional tile installer.
Here are a few things you didn’t mention…
-Always check your wall to ensure that everything is structurally sound
-It’s easier to cut tiles with a wet saw
-I like to use two trowels. A smaller one makes it easy to spread the mortar in the corners
-Always start laying the tiles on the countertop. This will allow all of the cuts to be at the top, out of sight-out of mind.