Methods Of Installing Wood Bun Feet On Cabinets
 There are two methods used for attaching wood feet to any cabinet. This is a great way to enhance the look of any bathroom or kitchen cupboard set. You can also make dressers, trunks, cedar chests and furniture look more expensive and high-end by attaching wood feet to them.
There are many different styles of bun feet available in several wood types. We recently did a review of Osborne Woodworking Products and found that they have a nice selection of round, tapered and fluted feet for cabinets and furniture.
All of the wooden support legs that you will find need to be stained, sealed, finished or painted. They are generally available in many unfinished wood selections.
Cabinet Feet Wood Type Choices
- Red Oak
- Hard Maple
- Lyptus
- Black Walnut
- Red Mahogany
- Cherry
- Alder
- Hickory
- Knotty Pine
- Soft Maple
Tools & Materials Needed For Installing Wood Feet
- Electric Drill
- Drill Bits
- Screw Driver Bits
- Yellow Glue
How To Install Bun Feet On A Cabinet
There are two methods used for installing bun feet to cabinets and furniture. The supports can be installed using wood dowels or fastened with screws.
Wood Dowel Method For Attaching Furniture Feet
You will need a drill and a drill bit to match the size of the dowel you will be installing. Drill the proper depth hole in the wood cabinet leg and also on the cupboard. Apply yellow glue to the dowel and insert it into the foot. Squirt glue on the dowel again and insert the fastener into the hole that you drilled on the cabinet.
If you have to drill the hole out a little because you didn’t get the original hole drilled straight, apply string to the end of the dowel to fill in the slop. You will want to saturate the string with yellow glue. Once everything hardens, you will have a nice secure bond.
If necessary, you can pound the fixture with a hammer to position the support leg tight to the cupboard or furniture piece you are working with.
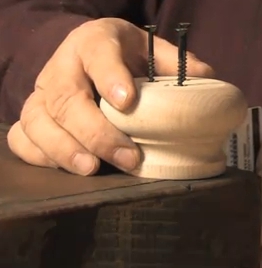
Fastening Wooden Bun Feet With Screws
You will drill three pilot holes in the feet. You will want to countersink the screws about a half inch (1/2″). The depth of the counter-sink will be determined by the length of the screws you are using. Position the furniture foot about an eight of an inch further out than the edge of the cabinet and secure it with three screws.
The beautiful thing about adding these wooden legs to things is that the possibilities are endless. You can dress-up an old trunk or cedar chest, make old antique furniture look restored, add the supports to book cases or take an ordinary looking cabinet and make it look extraordinary.
With a little creativity you will discover many different uses for the wood cabinet feet. This is a great way to dress up a few things and make them look more custom than they are. All you need is a drill, a few cabinet feet, a creative imagination and a little time to install them. This is an inexpensive way to add value to cabinets, book cases, wooden storage trunks and furniture.
