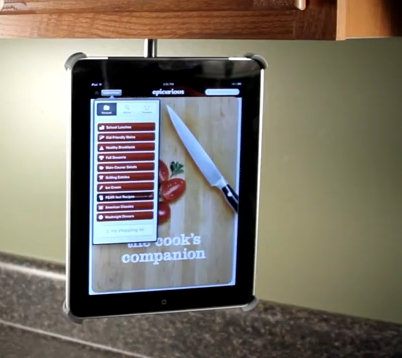
Accessories For Mounting an Ipad to a Cabinet
Tools Needed
- Electric Drill
- 5/16” Drill Bit
- Phillips-head Screwdriver
- Masking Tape
- Hammer
- Allen Wrench (supplied with kit)
- Drop Cloth
This support system has a tilting arm that rotates. The computer screen can be turned to face in any direction while working in the kitchen. Whenever it is not in use, you can push the Ipad holder upward until the clip-on pad touches the bottom of the upper cabinet. When the bracket is in the upright position it almost disappears.
How To Install an Ipad Shelf Support Bracket to an Upper Cabinet Bottom
There are less than ten steps involved in installing your Ipad support shelf to the upper/wall cabinetry. By the looks of the video, I would guess it can be done in less than fifteen minutes. There’s a list below this instructional video on how to install a rotating support shelf for an Apple Ipad.
- Place a protection pad, towel or drop cloth on the counter before beginning.
- Use the mounting template to find the registration holes.
- Pre-fit the template to your kitchen upper cabinet bottom.
- Add masking tape to hold the template in place.
- Drill the holes through the pattern and cupboard bottom (be careful to not blow-out the interior of the cabinetry).
- Remove the template and clean the area.
- Grab the T-nuts and screws provided with the installation kit.
- Fit the T-nuts in place.
- Install the mounting bracket with screws (be sure the mounting plate faces the back of the cabinet).
- If the T-nuts don’t seat fully, it may be necessary to “tap” them with a hammer.
- Insert the arm into the mounting cover.
- Install the cover making sure the slot for the arm faces toward the wall.
- Put the hex screws in place being careful to not over-tighten them.
- Get the versa mount, hex screws and arm cover.
- Attach the Ipad shelf support. Both hex screws should be tightened evenly. There should be equal space on either side of the mounting plate when you are finished tightening it.
- Tighten the hex-head screws until the arm swings smoothly.
- Clip your Ipad into position.
There… now that wasn’t so bad. The video for installing the Griffin Ipad support seems to make it look a lot simpler than my written installation instructions.
Installing a rotating shelf bracket for mounting an Apple Ipad to can be finished in a matter of minutes. The holder rotates, turns and swings for convenience. This is just one of many accessories that the Griffin company has developed for the Ipad.

