How To Install A Loose Countertop Backsplash
There are several situations where you will need to install a kitchen or bathroom loose backsplash. Not all countertops have this three and a half to four inch high wall protector attached to the top. Most granite and solid surface tops will not have the splashes attached. In some instances, Formica plastic laminate counters will not have a splash board attached either.
To Install The Loose Back Splash You Will Need A Few Items
- Liquid Nail Construction Adhesive
- Chop Saw
- Belt Sander
- Scribes
- Colored Caulk
- Prop Sticks
- Shims
- Place the loose backsplash into position and mark it where it needs to be cut to length. You can do this by measuring and marking it, but by setting it in place, there is less of a chance that you will make a mistake.
- Cut the material to the correct length. You only get one chance at this, so DO NOT cut it too short. Your chop saw cut MUST be right on the money.
- Set the splash into position and determine if your prop sticks will be able to force the gaps out between the bottom of the backsplash and the top of the kitchen or bathroom countertop. If you are working with granite, you will not be able to force anything. Corian or Formica backsplashes have a certain amount of flexibility.
- Mark a scribe line on the backsplash if you need to belt sand it to fit the contour of the countertop.
- Belt sand the excess splash material off and check it for fit. Repeat this operation until you have a very tight fit. You want the gap to be less than one sixteenth of an inch (1/16″). This is an acceptable gap for your colored caulking to fill.
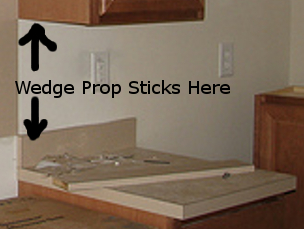
- Cut prop sticks that will wedge between the upper cabinet bottom and the top of the kitchen backsplash.
- Add a small bead of caulking on the countertop where the bottom of the splash will meet the surface.
- Squirt large circles of Liquid Nail adhesive on the back of the backsplashes. DO NOT add the glue near the edges. Only apply enough so that when you press the backsplash against the wall, the Liquid Nail will not ooze out at all.
- Press the backsplash tight to the wall and install the prop sticks into position. You want them angled enough to push the wall splash back tight to the wall and tight to the countertop.
- Add cabinet shims if necessary to create more friction.
 After letting the adhesive dry for twenty four hours, remove the prop sticks and use your colored caulking to fill in any gaps. Wipe the excess filler off with a damp rag.
If you have any questions at all about how to install a loose kitchen or bathroom countertop backsplash, please leave a comment. You know, during the installation process, when you are checking for gaps, you can shim the countertop up to eliminate void areas rather than sanding the backsplashes down to fit the top. Sometimes this can make the install go a lot quicker.
Related posts:
- How To Install Kitchen Backsplash Tiles Are you looking for a contemporary, clean update for your...
- How to Make a Backsplash Out of Photos This article will teach you how to make interestingly different...
- How to Install Glass Splashbacks in Kitchens The video below gives professional tips on how to install...
- Custom Kitchen Backsplash Ideas This is the most unique custom design for a kitchen...
Related posts brought to you by Yet Another Related Posts Plugin.
